CDJ1000 overview
Hello again,
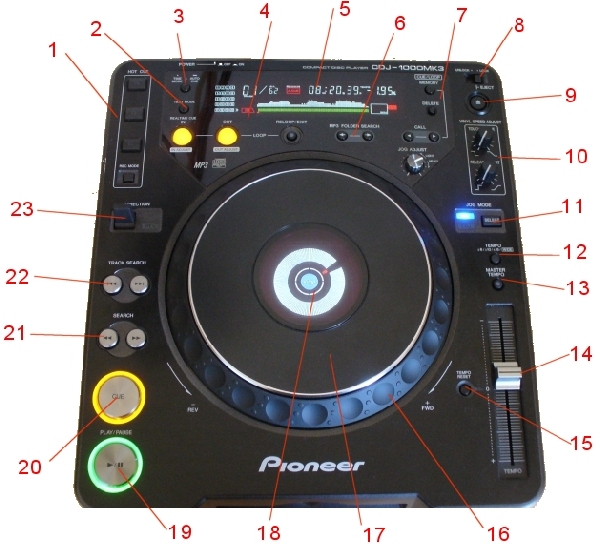
I’d like to spend a bit of time getting to know my CDJ1000 MK3. Following is an image showing the deck with the different features explained in brief. In the video I actually play some music and test these features out so you can see how they affect the music.

1 – Hot cue points
A cue point allows you to set a point in the track that you want to come back to. Here we have 3 placeholders, A, B, C. Use these to store cue points and come back to them quickly.
2 – Text mode
Alternate between showing a waveform of the track, showing the track name, album name, artist name.
3 – Time mode / Auto cue
Tapping the button alternates between showing the elapsed time of the track and the remaining time. Holding the button down for over a second alternates between auto cueing (the track pauses on the 1st beat when you go through the tracklisting) and not auto cueing (the track starts playing when you go through the tracks, so like how a CD player works).
4 – Looping
Loop points allow you to set start/end points in the track that continue to repeat over and over again until you exit the loop.
5 – LCD display
This displays the track’s waveform (basically a bar graph showing the volume level of the track and various points), text information, track time, pitch and a few more things.
6 – Folder search
The MK3 plays MP3 CDs so this allows you to navigate through the folders you’ve put on the CD.
7 – Memory cue/loop points
These buttons are used with the SD card that you can slot into the front of the CDJ. When you create loops or cue points for a track, it saves these on the SD card so it remembers them automatically.
8 – CD lock
This stops you from accidentally ejecting a CD when the Eject button is pressed.
9 – Eject
Time to change CDs.
10 – Vinyl speed adjust
This mimics the behaviour on vinyl turntables when you switch the power off or turn the power on. The turntable comes to a halt and speeds up gradually, not straight away. This setting gives you control on the speed of acceleration/deceleration.
11 – CDJ/Vinyl mode
You can change how the jog wheel behaves (explained below).
12 – Tempo range
You can set the upper and lower limits of the tempo slider button with this. If you want a huge range, choose ‘Wide’, for a small range choose ‘+6′.
13 – Master tempo
When you change the tempo of the track, you aren’t just changing its speed, you’re also changing its pitch/key. If you wish to change the speed without affecting the pitch, switch on master tempo. In essence you are just time-stretching the audio. Unfortunately the CDJ can’t do it the other way around where you keep the speed the same but change the pitch (called pitch-shifting). This is possible with some FX units and also with the Pioneer DJM-800 mixer (a feature called harmonic tuning).
14 – Tempo slider
Change the rate at which the track is playing. Without this, mixing tracks is pointless.
15 – Tempo reset
This sets the tempo to what it would be if the slider was at position 0. It’s a quick way to reset the tempo back to the tune’s original.
16 – Outer jog wheel
When paused, moving this rewinds/forwards the track. In CDJ mode you also hear a stuttering effect of the beat you’re on whilst paused. When a track is being played, moving this speeds up or slows down the tempo slightly until you let go.
17 – Inner jog wheel
When paused, moving this rewinds/forwards the track. In CDJ mode you also here a stuttering effect of the beat you’re on whilst paused. When a track is being played and you’re in CDJ mode, moving this speeds up or slows down the tempo slightly until you let go. If you’re in Vinyl mode, touching this pauses the track (and as mentioned earlier, you can use the vinyl adjust to change the rate of deceleration and rate of acceleration as soon as you let go to start playing again).
18 – Jogwheel LCD display
This shows a circle and where in the track you are with a rotating bit. You can see the cue point here also, making it easy to identify its position near a beat.
19 – Play/pause
I don’t need to explain what this does.
20 – Cue
A cue point as described earlier allows you to set a place in the track you can come back to quickly. A good use of the main cue point is to find the 1st proper beat in the track so when you’re trying to beat match, you can restart again and again until you get the tempo right. To set a cue point, make sure the track is paused then hit cue. You can use the jog wheel to fine tune the cue point, something I’ll show you in the video. You can also keep your finger on the cue button to start playing the track. When you let go, it just goes back to the cue point (so the same as pressing play followed by cue).
21 – Search
Keep your finger on these to rewind or fast forward through the track. If you also rotate the jog wheel at the same time, you go through the track super fast.
22 – Track search
Same thing but for tracks.
23 – Direction
You can flick this switch to play the track in reverse.
Until next time….
This was a brief introduction to the features on the CDJ. Next time I will be doing the same for the Xone 42 mixer. There is a standard set of features on all mixers so don’t worry if yours isn’t an Allen & Heath Xone 42.


